Welcome video- face first, for the overwhelmed person, tell them where to start. The easiest pouring medium to get. For me, that is Floetrol from the hardware store. 3 primary colors plus white. 8×10 canvases that you buy in a bundle so they are inexpensive.
Understanding Color
Insert video
Video Password: Every video in the workshop requires a password, it is the same password for every video and it is listed directly under the video so you don’t have to remember a thing. You can copy and paste it, and be sure that there are no blank spaces. The computer elves are very particular about that.
Video Password:PPFUN
Watch/Download on Vimeo. Need help downloading or with other technology issues? Check out the technology help page here.
 Colors are either BFFs (best friends forever) or Frenemies. The color wheel below is for you to print out and have as a handy reference for you as you’re playing.
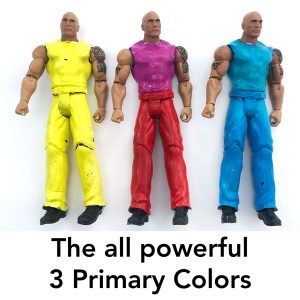
The theory behind the silly story of BFFs and Frenemies? Any time you have all 3 primary colors mixing together you get mud. Dwayne Johnson helped illustrate that point. Why did I use the Rock, Dwayne Johnson, in custom outfits for the visual? Because when you get all 3 primary colors you get mud wrestling. Strangely enough, there aren’t action figures of famous mud wrestlers (are there famous mud wrestlers?) so I decided to go with the one wrestler I knew who is awesome at everything he does.
For me, red can be a hot pink, a deep magenta, a Christmas red, any kind of red you love. Blue can be cobalt teal, or brilliant blue, or a deep phthalo blue, or any blue you love. Same for yellow.
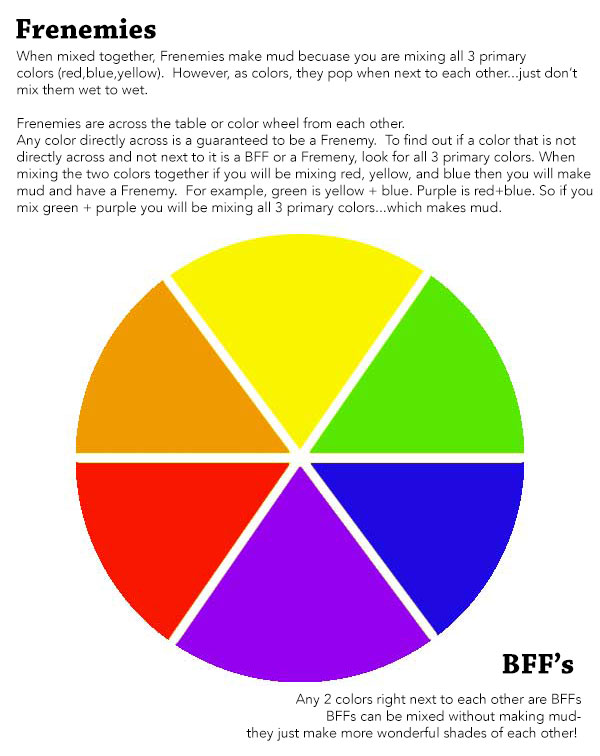 To download and print out the BFF & Frenemy color wheel, just right click on it, then select save image as to choose where on your computer you want to save it.
You’ll see me using 3 pouring mediums and you only need 1.
What can you do with the paint at the bottom of the box? Some ideas for you – dip gel plates in it to capture the pattern or let it dry and create a acrylic skin.
Making gravy method of mixing pouring medium.
Video 1- what to pour on, a way to catch the drips
Video Password:PPFUN
Watch/Download on Vimeo. Need help downloading or with other technology issues? Check out the technology help page here.
Video 2-mixing paint and pouring medium
Video Password:PPFUN
Watch/Download on Vimeo. Need help downloading or with other technology issues? Check out the technology help page here.
Video 3-making a pour
Video Password:PPFUN
Watch/Download on Vimeo. Need help downloading or with other technology issues? Check out the technology help page here.
Paint Thickness Video
Video Password:PPFUN
Watch/Download on Vimeo. Need help downloading or with other technology issues? Check out the technology help page here.
When pouring here’s a checklist to guide you
- mix paint and pouring medium
- optional, add oil
- make sure your canvas is level
- pour the paint using any technique you choose
- let it drip for 10-30 minutes
- Move to a drying rack and let dry for 12-48 hours (depends on how much paint, what kind, and which pouring medium)
The thickness scale for pouring mixtures
- Molasses
- Honey
- Syrup
- Water
Get your paints ready.
Level your canvas.
Pour the paint and play.
Let it drip for 10-30 minutes
Check for any bubbles and pop with a pin or toothpick.
Move to a drying rack to fully dry.
Need the video making the duct tape holder
When you start pouring, use only one pouring medium at a time. As the course progresses, you will see why that is as I share 2 different ways to mix them. But until then, just trust me and use just one at a time.
Knowing what I know now, and being able to see where my frustrations were in the beginning, I would start with a premium craft paint, inexpensive canvases, Floetrol and silicone. Why those? The more economy minded supplies take the pressure off. The colors in the DecoArts Premium held up pretty well. The inexpensive canvases took the pressure off of “wasting” an expensive one. The silicone was less expensive than the dimethicone (granted a smaller bottle, but less initial investment and it shipped faster). The Floetrol flows the least of all the mediums, so it is a bit easier to control than the more fluid ones. When I started, I loved the look right after doing a dirty pour, and as you will see, it changes a lot before it dries.
Goldilocks method, you have to try it to see what is just right for you. If it’s too runny, then you adjust. If it’s too thick, then you adjust, and this workshop is all about understanding what things do so you can adjust to find your just right formula/fit.
Mixing Paint Video
Intro: Why I don’t measure any more-
Surface tension experiment: https://www.youtube.com/watch?v=A8n678m6ZqI
There are no goods or bads or rights or wrongs just likes and don’t like or wants or not wanted. Each int, each pouring medium, each color, everything has pros and cons. This workshop is about helping you understand paint pouring so you can create the kinds of pours that make your heart happy.
So there is no one answer for everyone. It will take a few pours to get your sea legs, so give yourself permission to explore, to experiment, and know you can dover it up.
Videos
Set up, the boxes, drip pan, etc.
Using a level
Mixing paints and different mediums, cup vs. jar decision, squeeze bottles
Silicone or dimethicone
After it’s poured, the drying rack and cleaning edges
Sealing it- minwax vs. pouring it on or not at all
Why isn’t my canvas glass smooth when it dries? It looked that way when the paint was wet. The factors that impact the smoothness of the dried painting are what you poured on it, how much you poured on it, and the environment it was in while drying. As paint dries, if one area or part dries at a different rate than another part it leads to not perfectly smooth. That said, as we’re looking at the canvas on the table we see every little thing, but when it is on the wall, you don’t see that. Try it. Take one of your pours and look at it flat on a table then hold it up to the wall. It isn’t noticeable at all on the wall.
If you want super smooth, then you want to use the exact same brand and type of paint to mix your colors and Liquitex Pouring medium and be sure that the paint is evenly spread around the canvas. Using Floetrol also gives it a very flat dried look, no matter how much I use, it dries pancake flat. Show them skins with that difference to highlight which is which.
Here’s what you probably want to have to enjoy the workshop, something to pour on, like canvases or wood panels, acrylic paint in colors you like plus white, pouring medium (I’ll show you 3 different ones and you’ll learn the pros/cons of each. Of course you can use all 3 but you really only need 1), and if you like cells, then an additive. I’ll be using 2 different ones, and you’ve guessed it, I’ll tell you the pros and cons and you you decide which you like best or use them both.
Acrylic paints. Craft paint or artist grade? Whatever you like to use will be great! I’ll be using some of each kind of paint and as you are pouring using the techniques, deepening your understanding of what things happen, you’ll be able to better choose which paints give you the looks you love.
A Pouring medium- you’ll see me using Floetrol, Liquitex Pouring Medium and Deco Art Pouring Medium. Each has their pros and cons and any of these work well.
Additives- you’ll see me using silicone and dimethicone
Everything has a pro and a con- the big question is which pros are most important to you to have and which cons are most important to avoid.
Create video that shows how too much or too little looks, so the more translucent look the more the pouring medium and less the paint.
Substitute and experiment. This workshop is a guide, a place to start, and you are free to use the supplies and products that you have within arms reach.
Need a substrate or surface to work on. I will be using mostly 8×10 canvases in this workshop, but you can use anything that can handle getting wet with lots of paint and buckling. Could you cut up wood from the garage, yes! Could you use a big piece of cardboard? Probably not going to give you the result you want. The moisture from the paint will make it buckle and as it does that, it will make the paint slide around.
Paint
You can mix as you go or you can do it in batches. I prefer to do the prep work all at once so I have paint for lots and lots of play ready to go. I will premix the pouring medium and paint in Ball canning jars. Why those and not other jars? Because they were the most economical way for me to get a lot of jars quickly. Another option is to save empty jars with lids from the kitchen. Or any other kind of container with a lid.
Paint- any kind of acrylic paint and any brand. What I found is that the more fluid the paint, the easier it was to mix with the pouring medium. The thicker the paint, the more I had to mix. The higher grade of paint you use, the more vibrant your finished result.
Cup or Jar? Here’s how I made the decision for me, and by seeing my process, you can make the decision that is right for you. I hate prep work, when I want to play, I want to play. So any time I can prep in advance or in bulk, that is a good thing for me. I started with cups to get a feel for it, and what I found is I never had the right amounts – too much leftover of one color, or too little of what I wanted, so I went with jars so that I could use what I felt like and not worry about wasting or interrupting my play to mix more. Now, I mix a large jar of paint and medium, but when I started, I did a half jar. That way I had room to add more of whatever was needed, either more paint or medium to get the consistency I wanted.
There are all sorts of recipes out there for homemade pouring medium, and I’m a keep the prep work as simple as possible kind of a gal, so I use a pouring medium. Either Liquitex or DecoArt. I buy it by the gallon, which makes a lot of poured paintings.
Ratio of paint to pouring medium. This is completely negotiable. Here’s what I found I like using, but it is by no means the only ration to use.
Making cells. I use silicone oil or _____. Add it sparingly, a few drops go a long way.
I use condiment squirt bottles to allow me to precisely put the paint, and for certain kinds of paint pouring.
Plastic cups to for dirty pours, I like 12 ounces cups and little plastic bathroom cups.
You can add as little or lot of pouring medium to paint. There is no one right formula. There is no one right consistency. The thicker it is, the less fluid it is. Think hone moving on a plate vs. juice. The more pouring medium, the more translucent the paint will become. When I have a very extreme ratio, I tend to get more translucent, ethereal colors. Good? Bad? Neither, depends on what look you want.
Using a canning jar for measuring
300ml/10 oz/ around 1 1/4 cups
200 ml/just over 6 oz/ around 3/4 cup
Workspace
When pouring, it is helpful to have the canvas raised up off the counter so that the paint can drip off the edges. The quickest set up is 4 plastic cups and a tray of some kind to catch the run off.
After a day of playing, I wanted a different way than the cups. It was a great start but it had it’s drawbacks. So I bought a couple of cooling racks for the kitchen, cut the flaps off an Amazon box, and had a pouring station set up.
I found that paint drips off the edges and is magical. I didn’t want to waste it so I needed a different set up. Now with the box, I can easily put non stick teflon sheets in there or any non stick something to catch the paint. Once the paint is all dry, I can easily peel it off and use it too.
Teflon sheets to line your boxes or tubs.
Sharp pokey tool of some kind. Could an awl, a sharp craft knife, or anything you have that can poke a hole.